Now that I am underway, this is the re-building section. The freelanced railroad has an east and west section: east is the cityscape with railroad facilities and staging while the west is rural with a branch line serving coal and grain industry. The 2 sides are separated visually by a 24-inch high scene break.
The mainline end loops incorporate 42 and 40-inch radii dual mainlines with #10 Fast Tracks turnouts. The branch line uses #8 turnouts and evolves into a multi track staging yard on the west side before re-joining the main.
Since December, I have been working towards being able to run a train around a loop. And as good as the Fast Tracks system of tooling and aides are, there is still a lot of work involved. While Tim's excellent videos convey the major points, there are a lot of subtle nuances to be learned by trial and error.
To that end, I experimented with making almost continuous track work from straight to transitions to curves. Not so easy, if not a reason to drink more than I should. What I discovered is that I am constructing custom track sections of track to fit my plan and then joining them by old school rail joiners. But it works and the results are excellent. That took 3 days to discover.
There is a lot of work to be done to paint/stain, install, and weather the track and ties. Whether you buy the Fast Tracks flex ties or use individual wood ties in conjunction with the track fixtures, there are multiple steps. So we each develop what works best for us. While there are discussion forums on the Fast Tracks web site, answers to questions can take days to occur. Experimentation and discovery results.
Tim's abilities to solder great looking joints are evidenced on his videos. My skills took about 66 feet of track but now my joints are greatly improved - still not as good as those done by John Wickam in NJ from whom I buy my Fast Track turnouts, but still decent. As I progress, I use solder wick to remove excess solder at the tie to rail joint.
And do not even think about buying non-drilled ties or quick strips. The hardness of the wood used by Fast Tracks will bend any of the Micro Engineering ties. So, I use a Ryobi lithium ion powered screw driver from THD with a Micro Mark chuck and a #79 bit to drill a pilot hoe. I use the 3/16-inch long micro spikes. The "small" 1/4-inch spikes look out of proportion next to the scale ties and code 82 ME rail.
After weather proofing the sub-deck, I paint the cork road bed with ACE Hardware premium paint to seal. I use DAP Alex Plus to secure the ties/tie strips to the cork. Finally, I spike every 5th tie to the cork. Using Pliobond contact adhesive will also work to secure rail to tie, ties, to cork, and even cork to sub-deck. When all is done, Floquil colors are airbrushed to bring about a unified look of weathered rail and ties.
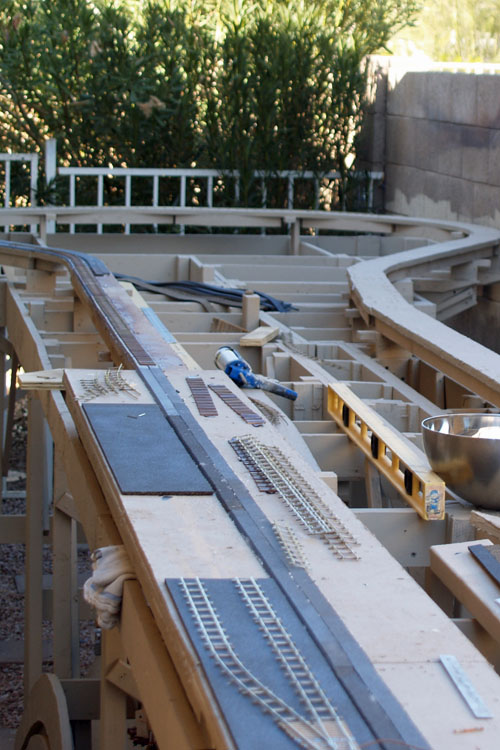
This is a view looking north to the 42-inch radius outer return. The larger section of plywood and cork pads are the passenger station area. Just to the bottom of the photo is where the private car tracks have been installed (branching off the passenger main via #6 Fast Tracks turnouts)..